
 www.ConcreteCottage.com
Chronicles of the Design & Construction of Two Waterfront Hurricane Proof Dry Stack Modular Green Custom Homes
1. Villa Lagoon, Wilder Italian Style Home
2. Nasello Italian Style Home
Construction of the Cuban Style Ceiling
Febuary, 2009
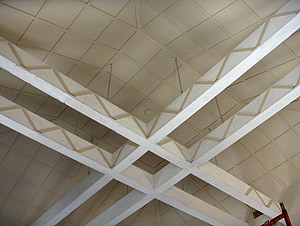
The ceiling height in the upstairs bedroom is really high. It is a little over 20 feet and the room has a real echo without any furniture or soft goods in it. When I was researching Cuban tile I came across photos of these unusual wooden ceiling structures in books about told Cuba. (See Right). I knew when I saw them that this was something I wanted to try to reproduce here in this room with the super height. When searching the web for info on Cuban ceilings, I found almost nothing. My books say that they came about because they are highly decorative and could be constructed using small pieces of wood. I grew up in a house that had interesting ceilings, so I guess I always think of ceilings as important as walls in a room. This photo of the blue Cuban ceiling is from the book Cuban Elegance which you can learn more about on one of my book pages. |
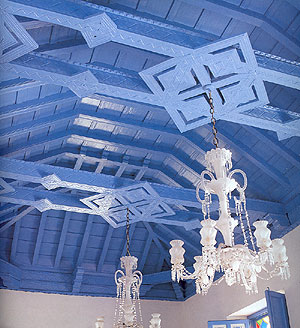
NOTE: This is not MY ceiling !!! |
|
| |
 |
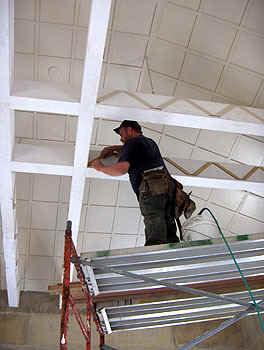
The wood our carpenter Aaron is using is finger-jointed planks. They function like top quality smooth pine boards but are really made up of lots and lots of small pieces all joined together. |

Aaron started by attaching blocks on the upper walls to build the fake beams around. |
|
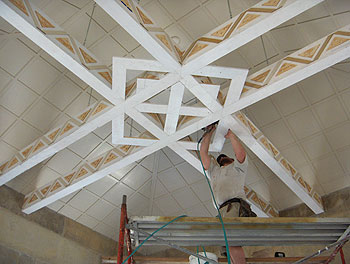
I know it will not be 100% authentic, but we hope to sorta achieve the look of a Cuban ceiling without spending a fortune. At least it will be a much more interesting and decorative ceiling that usual for the States. Dave and I worked like crazy trying to get all the boards primed for Aaron to start on this project this week. It was cold outside so we had to bring these giant long boards into the foyer and some in the guestroom where the heat was on and the paint would dry. Dave put in the most time on priming, he was a great sport about it. Aaron has been up and down that scaffolding a zillion times. He did all the lathe work that went straight onto the wall boards. Now he is using Dan's table-saw set up in the garage to rip a 45 degree angle on the boards that make up the 'beams'. Then Aaron both glued and nailed them together on the 45 degree joint. I don't know exactly how I am going to do it, but my plan is to use popsicle sticks to make the decorative zig-zag effect on the beams. I also got Aaron to cut out short pieces from the leftovers of small sticks that he used on the upper part of the ceiling. Dan had to buy a few more too. Aaron cut them and I made the design decisions and he attached them at angles the length of both sides of the beams. Now since our beams are not real beams, and they have a lot of add-on weight, I told Dan and Aaron that it was OK to use some chains or wires to add support in the center of the beam system. Dan bought some nice chain. Aaron did a neat as a pin job or attaching it. So if anyone ever asks why on earth the chain is there, I'll say to hold down the roof in hurricanes ! |
|
 |
 |
 |
 |
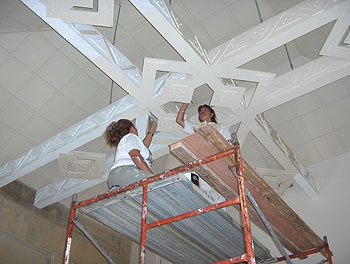
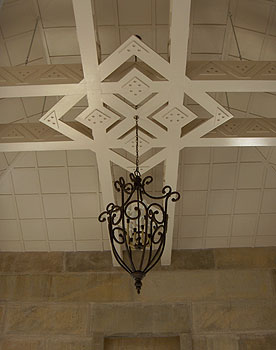
The plywood triangle pieces got attached to the beams between the zig-zag pieces of wood on all sides. I will probably get a fabo chandelier but in the meantime we are going to hang a wrought iron looking OK fixture that I got at Lowe's. Aaron has had to take the center section in and out a few times while he has built up all this and figured out to hang the fixture. |
|
 |
 |
There are four additional decorative smaller panels that go between the beams. I tried various arrangements of the popsicle sticks before deciding on the final design. |
 |
|
| |
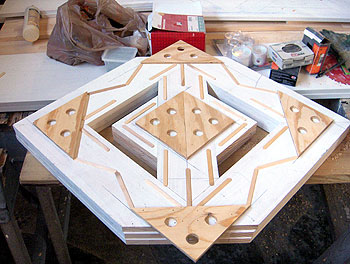 |
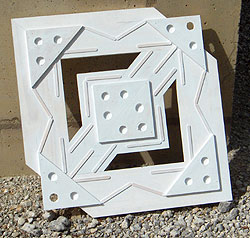
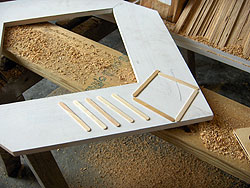
I have primed the 4 smaller medallion inserts. Luckily the holes are quickly painted using the tip end of a mini foam roller held in the hand like a pencil and squish it in. |
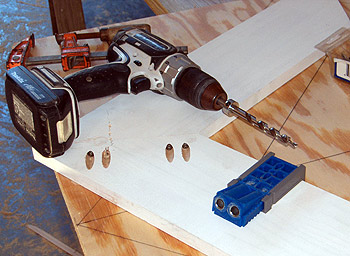
To make these mitered corner ceiling inserts, Aaron used a special tool that sits on the edge of a board and guides your special drill bit in at the perfect angle for wood screws. The company even makes wood plugs the exact shape and angle to drive into the drilled hole. You get an invisible but very secure way to join boards at the edge. |
|
 |
 |
 |
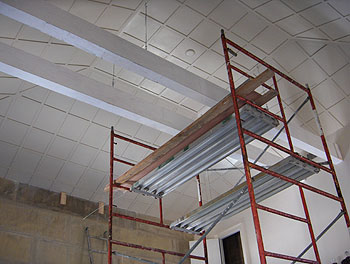
Fed Ex showed up with last parts needed to finish out our living room ceiling. We needed a few more pieces to make up the odd shaped panels we had running down the long hall. ACP and Evoba Ceilings has been a pure delight to deal with. They got the exact number of pieces out to us lickety-split. |
 |
Later on I put a coat of the ceiling paint, a glossy light taupe color. I figured that it would be a lot easier to paint these on the ground than 20 feet up in the air and upside down. Here you see the last of the stacked up maple ceiling panels and connector pieces from the living room ceiling that had to be whitewashed so Aaron and Dan can finish the fantastic living room ceiling. Work...work...WORK. |
Aaron was off for President's Day and the next day too, so hopefully tomorrow we can finish up the living room ceiling. Maybe the bedroom ceiling Cuban ceiling too. |
|
March 2009It was a big job for the painters to get all this primed and painted. You might know that the women on the painting team ended up doing this job. I did find that the round-y end of a small foam mini-roller, sometimes called a hot-dog roller, was perfect to use the end to paint the insides of the little holes in the plywood triangles. That made quick work of a contour that was very time consuming and difficult with a brush. |
 |
 |
|
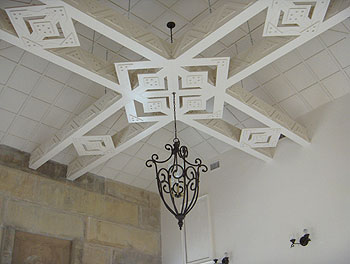
I am very pleased with how it looks. The lighting fixture from Lowe's worked out fine. It definitely looks better since I wrapped the bulb socket tubing in gold fan cord chain. |
 |
News Flash Here ! The Dac-Art home in Gulf Breeze is now on the market and it is a fabulous deal. They have it listed for way less than they spent building it. The owners love it but family matters have made them decide to move back to New Orleans. Gulf Breeze is a desirable area next to Pensacola. |
|
Villa Lagoon Tile
Introducing Encaustic Cement Tile to the Coast. Known the world over as mosaicos hidráulicos. The ideal floor for a hurricane proof project, residential or commercial, with global availability. Explore the beauty of cement tile.
You can support this website by starting all Amazon purchases here, just click thru our link![]() , or search below.
, or search below.
 | Copyright 2005-2016 All Rights Reserved Fort Morgan Web Development, Inc. | |
Original WebsiteVilla Lagoon Phase I completed in 2003 | New Website-2007-2009Phase II North Elevation w/ Frieze |