
 www.ConcreteCottage.com
Chronicles of the Design & Construction of Two Waterfront Hurricane Proof Dry Stack Modular Green Custom Homes
1. Villa Lagoon, Wilder Italian Style Home
2. Nasello Italian Style Home
February 2008: Concrete Acid Stain on Exterior Blocks
Saturday, February 18th 2008
|
On this house I am planning to do something that I have not seen done on any other homes in the States. In the manner of the lovely homes on the Lido in Venice, Italy, I am preparing to paint a colorful border, or frieze, on the top row of blocks that go just under the cornice, all the way around the exterior of the house. I took some photos of some of the Italian homes on the Lido when I was there last. I only saw this effect on the Lido, altho it might be popular elsewhere. Instead of using paint or tiles, I am planning to use concrete acid stain directly on my DAC-ART blocks. I should be able to achieve the look of aged polychrome designs that will harmonize with the old look of the Dac-Art blocks. My experience has been great with the acid stain being very long lasting and the location of the blocks that the frieze will go on is just under the cornice so it has a lot of protection from driving rain, etc. |
|
 |
|
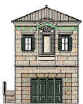
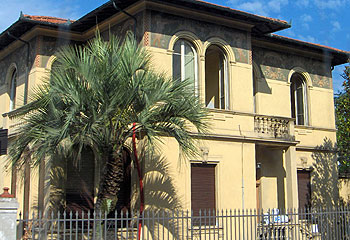
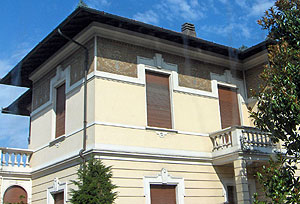
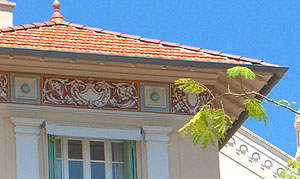
The Inspiration ! Here are photos of one house in Italy. One shows a close-up of the painted frieze just under the eave of the tile roof. |
|
 |
|
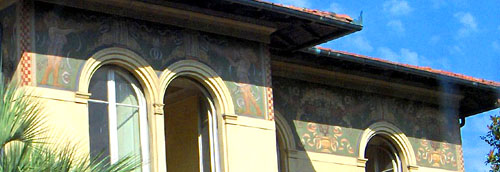
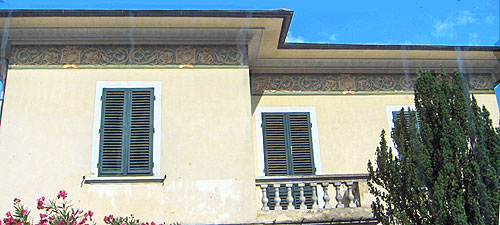
Another home in Italy with a painted frieze similar in size to what we hope top have. |
This European home (above) has a wide polychromatic frieze. |
These last few photos of homes were taken in Monte Carlo and one in St. Tropez. Seems that the multi-color frieze style is popular in beachy locations. |
 |
 |
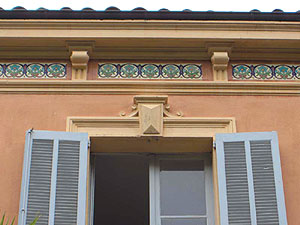 |
So hopefully, these snap shots of colorful exterior home decoration will give you an idea of the effect we hope to get with our concrete acid stains used directly on our dry stack blocks. |
|
 |
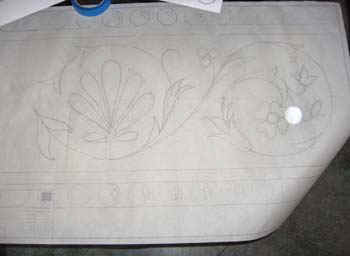 |
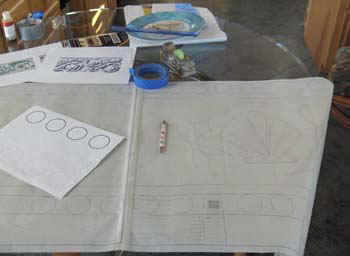
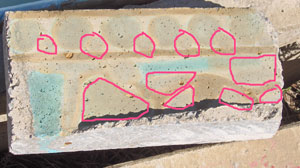
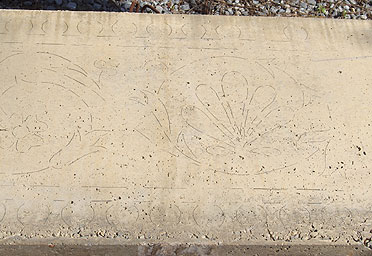
I am sketching out a Florentine type scroll design on some old vellum paper i have had since my days as a draftsman. I uses a dinner plate (see in left photo) to make the basic round guidelines. For the series of circles that I wanted on the top and bottom border, I printed out some precise circles on the computer. I am doing the drawing very large because this row of blocks where it goes will be way up high. I want to fill most of the height of the block with design. I did the old-fashioned thing of rubbing a soft leaded pencil on the back side of my sketch on vellum to make it work like carbon paper. I had some screaming green poster board on hand from another project so I put my sketch on top and traced over my lines to leave the marks on the neon green poster board. |
|
 |
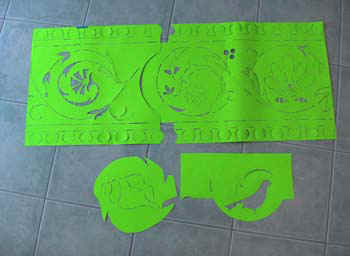 |
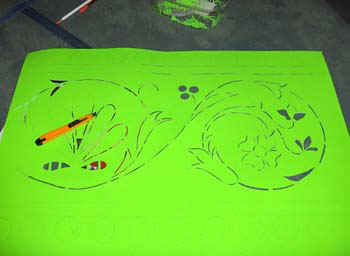
Using the small size el-cheap-o utility knife, I cut slits thru the poster board to use as a stencil on my blocks. I figured out how to use two sheets and cut one end in a manner that allows me to easily line it up with the correct spacing. I also cut some optional designs to use as center motifs in the alternating swirls. Today in the sunshine, I went out and laid the poster stencils on the blocks that New Stone Age Builders had laid out in order for this project. I used a pencil to mark my guide lines thru the poster, onto the blocks. I will freehand the painted acid stain lines, but the pencil guide lines will keep me on track and keep the spacing well balanced. |
|
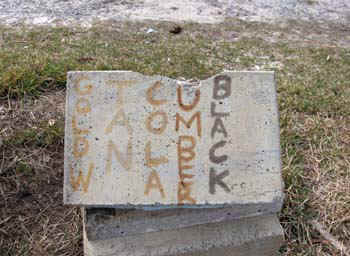
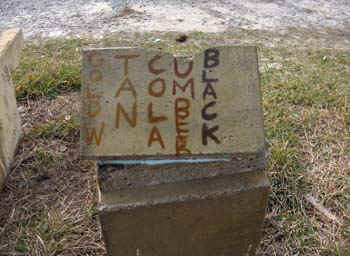
I have started testing concrete acid stain on my DAC-ART blocks in preparation for my big job of adding a multi-color design around the entire top row of blocks that go just under the cornice. I had two colors of SuperStone Concrete Acid Stain left from the construction of the Phase I Guest House. I had the colors SuperStone calls Aged Copper Green (actually blue) and Palmetto Green. This product had been in my mini-storage for about 5 years and looked OK, but I don't know if constant hot-cold cycles plus time caused any change to occur. I took a small paintbrush and made these marks, several coats, on a piece of scrap concrete block. The blue looks kinda blue but the green is definitely not green. But it did leave a permanent mark, so it could be useful. |
 |
Meanwhile, I met a super guy who is a concrete acid stain professional. His name is Chad Blackwell. Chad's business is: Xtreme Concrete Designs He is opening a new showroom in Foley on the road just West of Highway 59 that has the YMCA on it. Check my Villa Lagoon Partners page for the address and phone there. |
Chad was kind enough to give me a small sample of all of the colors of Kemiko Concrete Products that he uses. I did a sample on a piece of broken block. You can see the original look immediately after painting it (above) on the bare concrete and then a day later (below left). I poured water on it and the photo on right below shows how it looks wet. Keep in mind that these blocks already have some color added into the body of the mix. Chad is going to purchase some of the Kemiko Product in their green and blue colors for me to try. We both think that this will be the first example of anyone using concrete acid stain on the exterior of a residence to create a polychrome frieze. Many homes on the Lido, the beach island resort of Venice have colorful friezes. I made photos of several when I was there. I think this is a perfect effect for a water's edge Italian style home here on Little Lagoon. |
 |
 |
When concrete acid stain was first applied. |
Same Block the Next Day |
David Trull at Reynolds Ready Mix has been very helpful. He is the local DIY concrete acid stain supplier, 1-251-747-4238 or 1-800-239-3879. Call David for orders of Concrete Acid Stain product. |
Same Block the Next Day Wet |
|
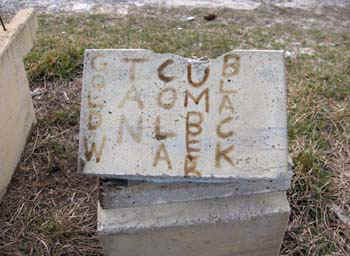
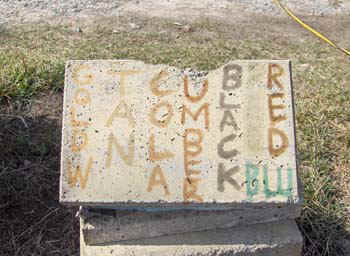
So I have been testing two kinds of concrete acid stain on scraps of my blocks. I have two colors of old product from when the guesthouse was originally built and some samples of new Keniko product that local concrete artist, Chad Blackstone was kind enough to give me. As is evident on the block on right, the new Keniko blue is much brighter than my old stuff that has been thru lots of hot-cold cycles in a mini-storage. What is suppose to be green is in the rectangle area between the words "RED" and "BLACK" on the block on left. It just isn't looking very green at all. Today I mixed some of both greens, the old Superstone green and the new Keniko green and tomorrow we will be able to see if the results were any better. |
|
 |
 |
 |
Here I drew marks around the places where I put the mix of green stain from two different companies yesterday (multiple coats) and as you can see, it doesn't look green. Oh well, I am communicating with the folks at Keniko about maybe using a different product that they supply. Stay tuned ! |
 |
 |
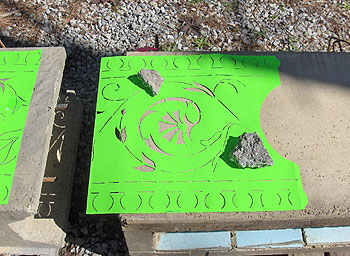
I have started using my stencils to mark my blocks with pencil lines to use as guide lines for the free hand painted decorations. I use chunks of concrete to keep things from blowing around. I am able to continue using the two stencils with the two extra center elements to move along the length of the blocks which are laid end-to-end. When I come to the end of a block, I skip about 1/2 inch of design to allow for the average width of about 1/2 in of grout. You can see on lower right the faint outlines in pencil on the block. |
|
 |
 |
Few Days Later... |
|
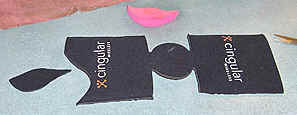
I need pretty sunny, warm days to be outside doing this block coloring. Luckily we had a nice weekend, really breezy, but sunny and warm. I finished drawing my basic shapes on Saturday, March 2nd and Dave Perry and I began applying color. I was making home-made stamps from that thick foam that craft stores sell for kids activities and mounting them on pieces of flip-flop soles to give them enough thickness to hold on to them and dip just the surface of the stamp in a shallow dish with the acid stain color solution in it. The foam is easy to cut with nice edges, and the flip-flop backing doesn't have to be cut with tons of precision. But, Dave had a better idea. He suggested I try using pieces of knit fabric foam core drink insulator stuff, usually called cozies, or huggers that fit around a canned drink. We got out a bunch of them and found that some were thicker than others and some had lumpy printing on them. Using the thickest and flattest printed ones, I cut out shapes of leaves, flowers, etc to make into stamps. This turned out to be a great idea. The foam hugger material held just the right amount of liquid concrete stain and didn't allow it to run out and make a mess. |
|
 |
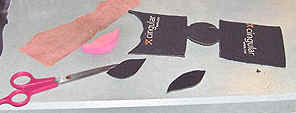 |
I used Gorilla Glue to attach the cut out huggie foam to the backing piece cut from flip-flop sole. It didn't dissolve the foam or the shoe foam like some solvent based glues do and it doesn't dissolve in water or liquids I was using like white glue will do. But, Gorilla Glue expands and makes a type of foam as it cures , so to keep everything nice and flat (not lumpy from expanding foam) I placed the freshly glued stamp on a glass table and put a book on top overnight. |
|
Continue to Coloring the concrete... |
|
Villa Lagoon Tile
Introducing Encaustic Cement Tile to the Coast. Known the world over as mosaicos hidráulicos. The ideal floor for a hurricane proof project, residential or commercial, with global availability. Explore the beauty of cement tile.
You can support this website by starting all Amazon purchases here, just click thru our link![]() , or search below.
, or search below.
 | Copyright 2005-2016 All Rights Reserved Fort Morgan Web Development, Inc. | |
Original WebsiteVilla Lagoon Phase I completed in 2003 | New Website-2007-2009Phase II North Elevation w/ Frieze |